Menchi Katsu (Ground Meat Cutlet) メンチカツ • Just One Cookbook %
Recipe Highlights
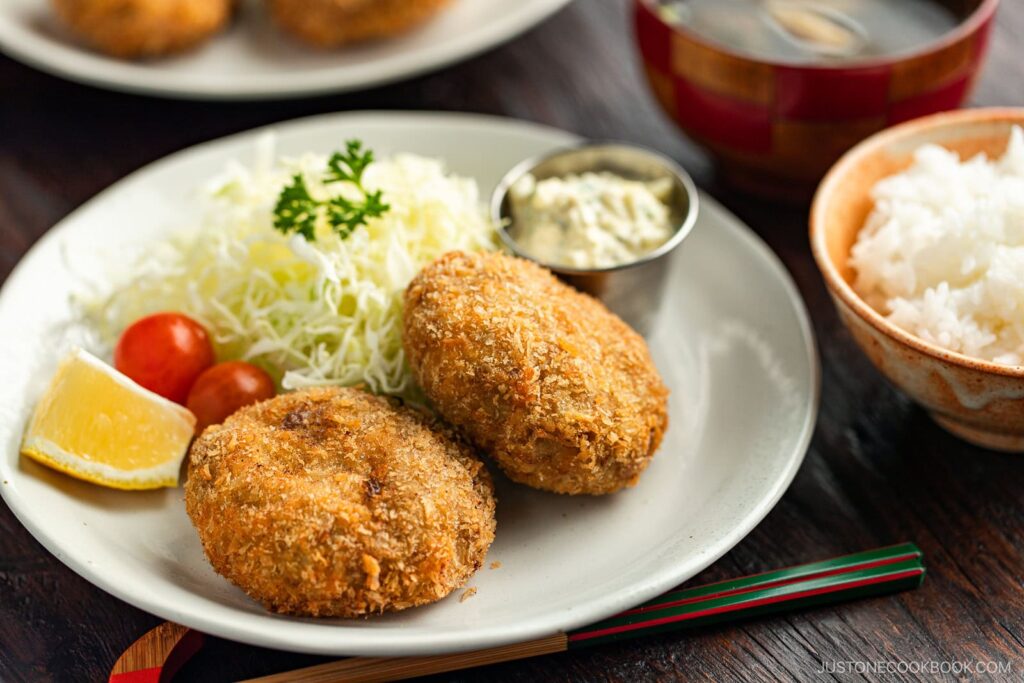
I first fell for menchi katsu at Japanese butcher shops and delis. They fry the patties fresh to order. The crisp panko shell and juicy center won me over. These days I make this Menchi Katsu recipe at home and serve it with my homemade tartar sauce.
Here’s why I keep coming back to this recipe:
- Crisp crust thanks to Japanese panko breadcrumbs
- Juicy, tender center from combining ground beef and ground pork
- Simpler to make at home than it looks
If you love Japanese fried foods, try my Tonkatsu, Baked Tonkatsu, and Katsu Curry next!

What is Menchi Katsu?
Menchi katsu (メンチカツ) is a Japanese ground meat cutlet—menchi from the English “minced” and katsu from “cutlet.”
A Tokyo restaurant created this yoshoku (洋食) dish during the Meiji era, over 100 years ago. Yoshoku refers to Western-style cooking adapted through a Japanese lens.
The dish later spread to the Kansai region, where it’s known as minchi katsu. Today, it’s a beloved staple at butcher shops and delis across Japan.
Ingredients for Menchi Katsu
- Ground beef and pork
- Onion
- Egg
- Panko
- Milk
- Nutmeg
- All-purpose flour, beaten eggs, and panko – for breading
- Salt and black pepper
- Extra virgin olive oil
- Neutral oil
- Sauce of your choice – Tartar Sauce, tonkatsu, Worcestershire, or ketchup + tonkatsu
Find the printable recipe with measurements below.
Jump to Recipe
How to Make Menchi Katsu
- Sauté the onion. Mince the onion, then cook it in a frying pan with olive oil until golden. Let it cool to room temperature.
- Mix and shape. Combine the meat, onion, egg, milk, panko, and seasonings. Knead until sticky. Divide into six portions, shape into ovals, and chill 30–60 minutes.
- Bread the patties. Dredge each patty in flour, dip in beaten egg, then coat in panko breadcrumbs. Set aside on a tray.
- Deep-fry until golden. Heat the oil to 320–340°F (160–170°C). Fry about 4–5 minutes per side, until golden brown.
- Drain and serve. Transfer to a wire rack to drain, then serve hot with the sauce of your choice.


Make Ahead Tips
- Prep the meat – Make the meat mixture the night before and refrigerate overnight—this actually helps the flavors meld. Shape, bread, and fry the next evening. Use within 1 day.
- Fry and freeze – Fry the patties, cool completely, and store properly. If you’re new to deep-frying, I recommend freezing the fried patties rather than raw ones—raw frozen patties are hard to cook through evenly.
Storage and Reheating Tips
To store: Let the menchi katsu cool completely, then refrigerate in an airtight container for up to 3 days.
To freeze: Let the menchi katsu cool completely, then freeze in a single layer until solid. Transfer to a freezer bag and freeze for up to 1 month.
To reheat: Place the menchi katsu on a wire rack or crumpled foil on a baking sheet. Bake at 325°F (160°C) for 20–30 minutes until heated through and crispy. No need to thaw—if reheating from frozen, bake longer.


Variations
Looking to change things up? Here are a few ideas to try.
- Adjust the meat ratio. More beef gives a firmer, more robust patty, while more pork makes it softer and juicier. Or go all beef for a beefier, more intense flavor.
- Try chicken or turkey. Ground chicken or turkey makes a leaner patty. Add a little extra panko to help it bind.
- Bake it. Pre-toast the panko, then bake the patties for a lighter version. See my Baked Chicken Katsu recipe for the technique.
- Add cheese. Tuck a small cube of mozzarella or cheddar into the center of each patty before breading. It melts into the filling as it fries—so good!
- Go meatless. Use a firm plant-based ground in place of the beef and pork.


What to Serve with Menchi Katsu
Round out the meal with these simple sides.


FAQ
What is the difference between menchi katsu and tonkatsu?
Tonkatsu uses a whole pork cutlet, while menchi katsu uses ground meat—beef, pork, or a blend—shaped into a patty. Both get a panko coating and a deep fry, but menchi katsu has a softer, juicier interior.
Why did my patties fall apart while frying?
A few things can cause this: not kneading the meat enough, too much moisture from raw onion, or skipping the chill. Make sure to knead until the mixture is pale and sticky, sauté the onion first to drive off excess moisture, and refrigerate the shaped patties for at least 30 minutes before frying. Tossing each patty between your hands before shaping also helps push out air pockets.
Can I make menchi katsu ahead of time?
Yes. Make the meat mixture the night before and refrigerate overnight—this actually helps the flavors meld. Shape and bread the patties just before frying. You can also freeze the cooked cutlets and reheat them in the oven straight from frozen.
What sauce goes best with menchi katsu?
I love homemade Tartar Sauce for its creamy, tangy bite. A tangy sauce balances rich, deep-fried food. Tonkatsu and Worcestershire sauce work well too. A mix of tomato ketchup and tonkatsu sauce (or Worcestershire) is great in a pinch. Don’t forget to serve with shredded cabbage on the side.
I’d love to hear how yours turned out! 💛 Please leave a star rating and comment below to share your experience. Your feedback not only supports Just One Cookbook but also helps other home cooks discover recipes they can trust.
Menchi Katsu
Before You Start
- This recipe requires 30 minutes of resting time. Gather all the ingredients.
To Make the Meat Mixture
- Mince ½ onion (called mijingiri in Japanese). Place it cut-side down and make ¼-inch horizontal cuts toward the root, then vertical cuts, and finally slice crosswise for an even dice.
Heat 1 Tbsp extra virgin olive oil in a frying pan over medium heat. Add the onion and sauté until translucent and golden brown. Transfer the onion to a large bowl and let cool to room temperature.
Add 1 lb ground beef and pork combination, 2 Tbsp panko (Japanese breadcrumbs), 1 Tbsp milk, and 1 large egg (50 g each w/o shell) to the onions. Season with ½ tsp nutmeg, ½ tsp Diamond Crystal kosher salt, and freshly ground black pepper.
- Knead the mixture by hand until it becomes pale and sticky. Divide it into 6 portions.Nami’s Tip: To prep ahead, make the meat mixture the night before and chill it overnight—this actually helps the flavors meld. Shape, bread, and fry the next day. See Notes for more make-ahead tips.
- Roll each portion into a ball, then toss it between your hands about 5 times.Nami’s Tip: Tossing releases trapped air from the meat, so the balls won’t break apart while deep-frying.
Shape into oval patties and arrange on a plate. Cover with plastic wrap and refrigerate for 30–60 minutes to solidify the fat.
To Bread the Patties
Prepare 3 separate bowls for ½ cup all-purpose flour (plain flour), 2 large eggs (50 g each w/o shell) (beaten), and 1½ cups panko (Japanese breadcrumbs). Dredge each patty in the flour, then coat in the beaten egg.
Coat with panko, fix the oval shape, and set on a tray.
To Deep-Fry
- Heat 3 cups neutral oil to 340ºF (170ºC). Check the oil temperature with an instant-read thermometer or wooden chopsticks dipped in the oil—if small bubbles form around the tips, the oil is ready. Add 2–3 patties at a time and deep-fry in batches (I cooked 2 at a time).Nami’s Tip: Do not crowd the pot, or the oil temperature will drop quickly. Your ingredients should take up no more than half the oil’s surface area at any time. For more tips, read my How to Deep-Fry Food guide.
- Leave the patties undisturbed for the first 2 minutes so they don’t break apart. Cook for 3 minutes, flip, and cook another 3 minutes, until golden brown. Drain on a wire rack for 1–2 minutes, then continue frying the remaining patties.Nami’s Tip: Residual heat will finish cooking the inside. Before frying the next batch, scoop out any crumbs in the oil with a fine-mesh skimmer—otherwise they’ll burn, stick to your new patties, and darken the oil.
To Serve
- Serve immediately, topped with the sauce of your choice. You can also tuck it into a Menchi Katsu Sandwich.Nami’s Tip: If you don’t have tonkatsu sauce, try my Tonkatsu Sauce recipe. I like to serve this with Japanese-style Tartar Sauce. Other options include Worcestershire sauce, or a combination of ketchup and tonkatsu sauce.
To Store
- Cool completely, then store in an airtight container. Refrigerate for up to 3 days or freeze for up to 1 month.To reheat, no need to thaw first—bake straight from frozen (or refrigerated) at 325ºF (160ºC) until warmed through and crispy, about 20–30 minutes.Nami’s Tip: Crumple your aluminum foil first, then spread it out. This allows the grease to drain away and makes your food crispier.
- Prep the meat – Make the meat mixture the night before and chill—this actually helps meld the flavors. Shape, bread, and fry for dinner the next evening.
- Fry and freeze – Cook the patties, cool completely, and flash-freeze in a single layer. Transfer to a freezer bag and freeze for up to 1 month. To reheat, bake from frozen in an oven at 325°F (160°C) for 20–30 minutes, until warmed through.
- Don’t freeze raw –Frying frozen raw patties browns the outside before the center cooks. Frying first, then freezing preserves quality better too.
Variations
- Adjust the meat ratio. More beef makes a firmer patty, while more pork makes it softer.
- Try chicken. Ground chicken or turkey makes a leaner patty. Add a little extra panko to bind it.
- Bake it. Pre-toast the panko, then bake the patties for a lighter cutlet. See my Baked Chicken Katsu recipe for the technique.
- Go meatless. Swap in a firm plant-based ground meat for the beef and pork.
- Make it a sando. Tuck a cutlet into toasted milk bread with shredded cabbage and sauce for my Menchi Katsu Sandwich.
Calories: 477kcal, Carbohydrates: 25g, Protein: 32g, Fat: 27g, Saturated Fat: 15g, Polyunsaturated Fat: 2g, Monounsaturated Fat: 8g, Trans Fat: 1g, Cholesterol: 182mg, Sodium: 425mg, Potassium: 506mg, Fiber: 1g, Sugar: 2g, Vitamin A: 169IU, Vitamin C: 1mg, Calcium: 74mg, Iron: 5mg
Did you make this recipe?
Tag @justonecookbook on Instagram so we can see your delicious creation!
Editor’s Note: This post was originally published on January 14, 2011, updated with new images and revised recipe on August 17, 2018, and republished with more helpful content on July 12, 2026.